


- NEW DVD Series – Stone Setting with Bezels
- Tube Set Charm by Kim St. Jean
- Prong Basket Pendant by Kim St. Jean
- NEW DVD Series – Stone Setting with Cold Connections
- New DVD Series – Stone Setting with Wire
- NEW DVD Series: Introduction to Stone Setting by Kim St. Jean
- Featured Tool: Bracelet Bending Plier
- NEW Dvd by Eva Sherman
- Fun, Fast Fold Forming DVD Series
- Double Band Ear Cuff from Alex Simkin
Wire Jewelry Tip October 30: Soldering Basics

by Narlene Allen, Wire-Sculpture.com
Wire Jewelry Tip of the Day for October 30, 2013
Soldering Basics
Today we are going to discuss a skill that is very important for any jewelry artist to know: soldering.
What is Soldering?
Soldering is the most common technique for joining two or more metals together. In the soldering process, two elements are used: heat and solder. A solder is a metal alloy that has a lower melting point than the metals do that are to be joined together. When the heat from a soldering torch comes into contact with the solder and metals, the solder will melt before the metals do, causing the melted solder to flow and connect the separate pieces together.
What tools or materials do I need to get started?
Solder: Solders are categorized into hard, medium, and easy (soft). The categories indicate their melting points. For example, soft solders have lower melting points than medium and hard solders. It is the hard solders that are typically used in jewelry making or for precious metals. If a piece needs to be soldered more than once, start with a hard solder, and then move to a medium (or a medium and move to a soft). This way the first solder will not re-melt.
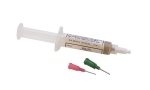
Silver Solder Paste found on Wire-Sculpture.com
Flux: The purpose of flux is to facilitate the soldering process and acts as a reducing agent and helps prevent oxidation during the soldering process.

Aqui Flux on Wire-Sculpture.com
Flux brush: A small brush used in cleaning metal surfaces before soldering.
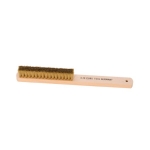
Wood Handle Metal Brush found on Wire-Sculpture.com
Tweezers: For holding small gemstones or metal while soldering.
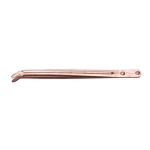
Copper Pickling Tweezers found on Wire-Sculpture.com
Torch: Small hand held Butane torches are used to heat solder.
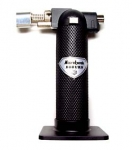
Butane Gas Jewelers Torch found on Wire-Sculpture.com
Soldering Block: Soldering blocks are a durable, smooth and heat-reflective surface for use with soldering, and typically made of charcoal or a non-asbestos material.
Charcoal Block found on Wire-Sculpture.com
Safety glasses/eye protection; always wear protective eye wear when working with metal or chemicals.
Note: It is important to take safety precautions when soldering. Wear protective clothing, eye protection, make sure the area is well ventilated, and don’t touch the tip or element of a soldering iron. The three major hazards of soldering are heat, fumes, and the lead content of the solder. When possible, substitute lead free solder for leaded solder.
Steps in Soldering:
1. Fitting
2. Cleaning
3. Fluxing
4. Solder Placement
5. Heating
Now, let’s go into a bit more depth about each step.
Step 1: Fitting
Soldering is much more challenging when the two or more pieces of metals to be connected together do not make a fitted “join”; fitted join meaning the smooth, built-in or even point of connection with the other. The edges that will be soldered together must have a fitted match to ensure a secure and lasting bond. In order to do this, filing may be necessary. Make sure that the surfaces are free of dents, warping, and kinks. If joining two flat edges together (butt join), it is recommended to bevel the surfaces so that the metal or wire is overlapping the other. This will allow for a strong joint.
Step 2. Cleaning
It is important that your metals are clean, and free of dirt, grease, and oil. This is because solder will not flow on an unclean surface. Unclean surfaces include those with fingerprints! Cleaning can be accomplished by pickling or sanding. Pickling, a chemical process, is very effective. In order to clean the metals using this method the following items are needed: pickle, pickle pot, tongs, and tweezers. Pickle is an acidic solution and can come in a liquid or powder form. As for the pickle pot, an old coffee pot on top of a hot plate or small crock pot will suffice. Once you designate your equipment as a pickle pot, it should never be used for cooking or brewing again. After pickling, the metals need to be washed thoroughly in water with a little baking soda (a copper tong should be used to take the metals in and out of the pot–copper will not contaminate the pickling solution). Dry well.
A wet pumice stone and bristle brush or a clean piece of emery paper will also work for cleaning. Use a clean pair of tweezers to manage the metals with after they have been cleaned.
Step 3. Fluxing
All areas to be soldered need to be covered with flux (unless using paste solder). Each piece of solder should also be fluxed. Soldering flux helps dissolve and prevent oxidation of the base metal. It also acts as a wetting agent allowing easier spreading of the solder around the join. There are many soldering fluxes on the market available for use.
Step 4. Solder Placement
Prepare a few snippets of solder; these are called pallions. With a pair of tweezers or a flux-moistened brush tip, place the solder paillon on the join. Do not use more paillons than necessary for the join, as it is difficult to melt and remove as well as causing blemishes. If excess solder does flow off the join, it can be removed by filing.
Step 5. Heating
Using a torch, carefully and quickly preheat the entire metal area evenly to provide solder flow. If the solder is heated without heating the entire piece first, it melts and forms a ball that cannot enter the join. Equally heat the two or more pieces that are to be connected together. Once the piece begins to glow, the solder will flow and will fill the seam. Working in soft light will increase your capability to see the metal glow. Melted solder is attracted by heat and will always flow toward the hottest spot. By moving the torch, you can target the solder to flow in the manner you desire.
After the solder has melted to your satisfaction, cool, and place the piece in a warm pickle bath to remove oxidation. It can also be boiled to increase the cleaning time.
Metalworking 101:
If you are excited about learning how to use soldering in your creations, then why not learn from the best?
In our DVD series, Metalworking 101, Patti Bullard gives you everything you need to know without any previous experience. Watch as Patti shows us little bit about what she covers.
If you don’t already have Flash Player, click here
to install it in under a minute for FREE!
Patti is a jewelry instructor, the inventor of Wubbers® pliers, and a lifelong artist has taught wire working and metal-smithing across the United States since 2004, and loves sharing her enthusiasm and techniques with others. Patti’s experience in many forms of jewelry creation has given her a unique insight into the best tools and creation methods, and she enjoys teaching others how to craft unique jewelry pieces. You’ll be amazed how easy Patti makes soldering!
Pick up your Metalworking 101 DVD’s today!

Metalworking 101 DVD Beginner Set
Wrapping it up:
If you’ve never attempted soldering before, why not try it today? It’s never too late to learn something new!
We are always looking for submissions for weekly tips or new wire artists! If you have an amazing pattern that you’d like to share, simply Click Here to submit your idea. You could be featured on our Blog or we might pick your pattern!
Resources:
Click to Receive Daily Tips by Email
Related Posts


3 Comments

Wire Jewelry Ideas
-
 See Yourself as a Creative Thinker-Part IV By Karen Meador, PhD
Wire Jewelry Article for September 27th, 2017 If...
- September 27, 2017
-
 See Yourself as a Creative Thinker-Part III By Karen Meador, PhD
Wire Jewelry Article for September 20th, 2017 If...
- September 20, 2017
-
 See Yourself as a Creative Thinker-Part II By Karen Meador, PhD
Wire Jewelry Article for September 13th, 2017 If you...
- September 13, 2017
-
 See Yourself as a Creative Thinker By Karen Meador PhD
Wire Jewelry Article for September 6th, 2017 This is...
- September 6, 2017

Design & Inspiration
-
 Free Pattern: Smile Cluster Necklace by Karen Meador
by Judy Ellis, Wirejewelry.com Wire Jewelry Pattern for August...
- August 7, 2017
-
 Free Pattern: Long crystal round maille earrings by Kylie Jones
by Judy Ellis, Wirejewelry.com Wire Jewelry Pattern for August...
- August 3, 2017
-
 Free Pattern: Stone Twist Wrap by Karen Meador
by Judy Ellis, Wirejewelry.com Wire Jewelry Pattern for July...
- July 31, 2017
-
 Free Pattern: Floating Bead Earrings By Kimberly Newman
by Judy Ellis, Wirejewelry.com Wire Jewelry Pattern for July...
- July 27, 2017
Featured Tools
-
 Get to Know Your Hand Tools – Tube-Cutting Jig By Helen I. Driggs
by Judy Ellis, Wirejewelry.com Wire Jewelry Tip for August...
- August 4, 2017
-
 Wire Jewelry Video: Using Punch Pliers by Judy Freyer Thompson
by Judy Ellis, Wirejewelry.com Wire Jewelry Tip for August...
- August 2, 2017
-
 Wire Jewelry Video: Aligning a Hole Punch by Judy Freyer Thompson
by Judy Ellis, Wirejewelry.com Wire Jewelry Tip for July...
- July 26, 2017
-
 Get to Know Your Hand Tools – Wire Cutters – Helen I. Driggs
by Judy Ellis, Wirejewelry.com Wire Jewelry Tip for July...
- July 25, 2017
Catherine Poutasse
November 3, 2013 at 3:39 am
I am so interested in seeing a solder gun for jewelry soldering. However, I have not seen instructions on how to solder with the gun. Can you give me more information on using
one? I have COPD and can only solder with someone standing
by to shut my oxygen off and put it back on. It is very limited and risky to operate this way. Thanks for any information you can give me…Catherine
Bonny
October 17, 2014 at 3:55 pm
Catherine: I don’t think you can solder jewelry with a solder gun like you would solder wire together. Jewelry soldering is a different process and does need a torch and the special solder for jewelry…this is usually called ‘hard’ soldering and the other is ‘soft’ soldering. The latter is not strong enough for using in jewelry.
Kat
January 2, 2016 at 7:19 am
Please Talk about Soldering more in depth. I want to know more about it.
“Keep Up The Great Teaching”.