


- NEW DVD Series – Stone Setting with Bezels
- Tube Set Charm by Kim St. Jean
- Prong Basket Pendant by Kim St. Jean
- NEW DVD Series – Stone Setting with Cold Connections
- New DVD Series – Stone Setting with Wire
- NEW DVD Series: Introduction to Stone Setting by Kim St. Jean
- Featured Tool: Bracelet Bending Plier
- NEW Dvd by Eva Sherman
- Fun, Fast Fold Forming DVD Series
- Double Band Ear Cuff from Alex Simkin
All posts tagged "copper"
-
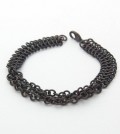 Free Pattern: Copper Braided Chain Maille Bracelet
by Judy Ellis, Wirejewelry.com Wire Jewelry Pattern for May 15th, 2017 Copper Braided Chain Maille Bracelet by Kylie Jones This bracelet uses the 4 in 1 chain maille weave in a thin band with a decorative plaited...
- Posted May 15, 2017
-
Gem Profile Apr. 5: Goldstone
by Layna Palmer, Wire-Sculpture.com Goldstone Shop Goldstone Beads | Shop Goldstone Cabochons I’ve always liked goldstone; it’s not really gold, and it’s not really a stone, but it sure is pretty! So, if goldstone isn’t really gold...
- Posted April 5, 2013
-
Gem Profile July 20: Sonora Sunrise
by Rose Marion, Wire-Sculpture.com Sonora Sunrise, or Sonoran Sunset Sonora Sunset, also called Sonora Sunrise or Sonoran Sunrise (both are accepted), is Cuprite and Chrysocolla joined in a single stone. Chrystocolla is the bright green, even turquoise...
- Posted July 20, 2012
-
Jewelry Making Resource July 18: Green Verdigris Recipe
by Rose Marion, Wire-Sculpture.com With alternative metals like copper and bronze becoming more and more popular, it’s only natural to notice how much the colors change over time! While some of us try to resist the tarnish...
- Posted July 18, 2012
-
Wire Jewelry Resource June 20: Nickel Silver and Copper, 2 More Base Metals
by Rose Marion, Wire-Sculpture.com Last week, I told you about Bronze and Brass, 2 base metal wires; and today it’s time to talk about nickel silver and copper. Copper Here’s an interesting statistic about copper I found:...
- Posted June 20, 2012
-
Wire Jewelry Idea: Coating Base Metal Wires to Preserve Shine
by Rose Marion, Wire-Sculpture.com Wire Jewelry Idea: Coating Base Metal Wires to Preserve Shine Some time ago, Casey Willson left a comment on this popular tip of the day, Prevent Tarnish on Copper and Nickel Silver, mentioning...
- Posted November 30, 2011
-
Wire Jewelry Printable Resource: Wire Footage Charts
by Rose Marion, Wire-Sculpture.com Wire Jewelry Idea for November 2, 2011 Here at Wire-Sculpture, we cut our wire by the foot for your convenience, rather than shipping you a quarter-ounce, half-ounce, or full ounce of jewelry wire....
- Posted November 2, 2011
-
Daily Wire Tip: Working with Copper Tarnish
Daily Wire Jewelry Making Tip Question: I use a lot of copper wire and like the look of high shine on some of my hammered heavy-gauge pieces. I use steel wool and it almost glows. However, the...
- Posted August 23, 2011
-
How to Clean Copper and Brass Jewelry Wire
By Mary W. Bailey In these economic times, we as artists and jewelers are faced with the shock of the price increases in precious metals. Silver and gold prices have skyrocketed and we are finding ourselves faced...
- Posted August 7, 2011
-
Daily Wire Tip July 12: Resources for Preventing Tarnish on Copper
Daily Wire Jewelry Making Tip for July 12, 2011 Question: Hi! I have recently begun making jewelry after years in between a high school course and have a love for metal work. Although copper is my favorite...
- Posted July 11, 2011
-
Daily Wire Tip June 30: Prevent and Remove Verdigris
Daily Wire Jewelry Making Tip for June 30, 2011 Question: I have a question about verdigris. How can you clean old pieces of jewelry (copper, brass, sterling) that have this powdery blue/green substance on it? Why does...
- Posted June 29, 2011
-
Daily Wire Tip May 26: Sterling Silver Alternatives?
Daily Wire Jewelry Making Tip for May 26, 2011 Question: Hello Dale, I love this site and have learned so much from you. I do a lot of wire wrapping and since the precious metals have become...
- Posted May 25, 2011
-
Daily Wire Tip: Removing Condensation Marks from Wire
Daily Wire Jewelry Making Tip Question: I have some copper wire and brass wire that I think has become tarnished. It looks like dark spots along the length of the wire. Can this be removed? I’ve tried...
- Posted May 1, 2011
-
Daily Wire Tip Feb. 20: Copper Snapsets
Daily Wire Jewelry Making Tip for February 20, 2011 Question: Do you have copper snapsets? If so, what are the pros and cons? -Ellie in Mechanicsville, Virginia Answer: No, Ellie, we do not carry copper snapsets. Your...
- Posted February 19, 2011
-
Daily Wire Tip Jan. 1: Forging Silver Enameled Wire
Daily Wire Jewelry Making Tip for January 1, 2011 Question: Can silver enameled copper wire be forged to an extent that would not destroy the enameling? -Vivian in Goodlettsville, Tennessee Answer: The best way to forge enameled...
- Posted January 1, 2011
-
Daily Wire Tip Dec. 29: Oxidizing Sterling Silver
Daily Wire Jewelry Making Tip for December 29, 2010 Question: I want to make some sterling silver jewelry and oxidize the silver by using liver of sulfur. Should I oxidize the wire before putting the jewelry together,...
- Posted December 29, 2010

Wire Jewelry Ideas
-
 See Yourself as a Creative Thinker-Part IV By Karen Meador, PhD
Wire Jewelry Article for September 27th, 2017 If...
- September 27, 2017
-
 See Yourself as a Creative Thinker-Part III By Karen Meador, PhD
Wire Jewelry Article for September 20th, 2017 If...
- September 20, 2017
-
 See Yourself as a Creative Thinker-Part II By Karen Meador, PhD
Wire Jewelry Article for September 13th, 2017 If you...
- September 13, 2017
-
 See Yourself as a Creative Thinker By Karen Meador PhD
Wire Jewelry Article for September 6th, 2017 This is...
- September 6, 2017

Design & Inspiration
-
 Free Pattern: Smile Cluster Necklace by Karen Meador
by Judy Ellis, Wirejewelry.com Wire Jewelry Pattern for August...
- August 7, 2017
-
 Free Pattern: Long crystal round maille earrings by Kylie Jones
by Judy Ellis, Wirejewelry.com Wire Jewelry Pattern for August...
- August 3, 2017
-
 Free Pattern: Stone Twist Wrap by Karen Meador
by Judy Ellis, Wirejewelry.com Wire Jewelry Pattern for July...
- July 31, 2017
-
 Free Pattern: Floating Bead Earrings By Kimberly Newman
by Judy Ellis, Wirejewelry.com Wire Jewelry Pattern for July...
- July 27, 2017
Featured Tools
-
 Get to Know Your Hand Tools – Tube-Cutting Jig By Helen I. Driggs
by Judy Ellis, Wirejewelry.com Wire Jewelry Tip for August...
- August 4, 2017
-
 Wire Jewelry Video: Using Punch Pliers by Judy Freyer Thompson
by Judy Ellis, Wirejewelry.com Wire Jewelry Tip for August...
- August 2, 2017
-
 Wire Jewelry Video: Aligning a Hole Punch by Judy Freyer Thompson
by Judy Ellis, Wirejewelry.com Wire Jewelry Tip for July...
- July 26, 2017
-
 Get to Know Your Hand Tools – Wire Cutters – Helen I. Driggs
by Judy Ellis, Wirejewelry.com Wire Jewelry Tip for July...
- July 25, 2017