


- NEW DVD Series – Stone Setting with Bezels
- Tube Set Charm by Kim St. Jean
- Prong Basket Pendant by Kim St. Jean
- NEW DVD Series – Stone Setting with Cold Connections
- New DVD Series – Stone Setting with Wire
- NEW DVD Series: Introduction to Stone Setting by Kim St. Jean
- Featured Tool: Bracelet Bending Plier
- NEW Dvd by Eva Sherman
- Fun, Fast Fold Forming DVD Series
- Double Band Ear Cuff from Alex Simkin
All posts tagged "wire jewelry"
-
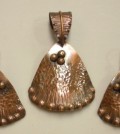 FREE Pattern: Triangle Shield Earrings, Pendant and Bail
by Judy Ellis, Wirejewelry.com Wire Jewelry FREE Pattern for February 13th, 2017 Triangle Shield Earrings, Pendant and Bail by Judy Larson Today we feature another great sheet metal pattern from Judy Larson. This easy to make sheet...
- Posted February 13, 2017
-
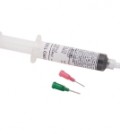 Soldering on Copper
by Judy Ellis, Wirejewelry.com Wire Jewelry Tip for February 6th, 2017 Soldering on Copper by Judy Larson Today’s article is from our good friend, Judy Larson. If you have ever had any questions about how to solder...
- Posted February 6, 2017
-
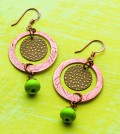 FREE Pattern: Disc Cutter Earrings
by Judy Ellis, Wirejewelry.com Wire Jewelry Making Pattern for February 3rd, 2017 Disc Cutter Earrings Today we bring you an easy metal jewelry making tutorial by Helen I. Driggs A little about Helen: HELEN I. DRIGGS is...
- Posted February 3, 2017
-
 Webbed Heart Necklace
by Judy Ellis, Wirejewelry.com Wire Jewelry FREE Pattern for February 1st, 2017 Valentine’s Day – Webbed Heart Necklace Well the month of love is officially here, and I thought I’d share our beautiful Webbed Heart Necklace pattern...
- Posted February 1, 2017
-
 Walk-ups Welcome!
by Judy Ellis, Wirejewelry.com Wire Jewelry Class Information for January 30th, 2017 Walk-ups Welcome! If you are in Tucson and still want to register for classes – we still have spots available and walk-ups are welcome! Grab...
- Posted January 30, 2017
-
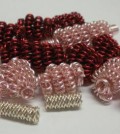 How to Make a Wire Coil and Bead
by Judy Ellis, Wirejewelry.com Wire Jewelry FREE Pattern for January 25th, 2017 Wire Coil and Bead by Judy Larson Today I’d like to share a really simple pattern from our good friend, Judy Larson. Here’s what she...
- Posted January 25, 2017
-
 There’s Still Time
by Judy Ellis, Wirejewelry.com Wire Jewelry Class Information for January 23rd, 2017 There’s still time to Register for Classes in Tucson Classes begin this week – but if you are going to Tucson – there is still...
- Posted January 23, 2017
-
 Beginner Skill-Wire Wrapped Loops
by Judy Ellis, Wirejewelry.com Wire Jewelry Tip for January 20th, 2017 Beginner Skill-Wire Wrapped Loops by Judy Larson Today we bring you another great tip for beginners. How to make a wire wrapped loop. This is a...
- Posted January 20, 2017
-
 FREE Pattern: Beaded Chevron Pendant
by Judy Ellis, Wirejewelry.com Wire Jewelry FREE Pattern for January 18th 2017 Beaded Chevron Pendant by Helen Driggs Today, I thought I’d share a great new metalworking pattern from one of our contributors, Helen Driggs called the...
- Posted January 18, 2017
-
 Live Streaming Classes from Tucson
by Judy Ellis, Wirejewelry.com Wire Jewelry Class Information for January 16th, 2017 Live Streaming Classes from Tucson I have some VERY EXCITING NEWS! This has NEVER happend before in Tucson AZ 6 Additional Tucson Gem Show Classes...
- Posted January 16, 2017
-
 Using Household Super Glue on Minor Cuts, Nicks and Scrapes
by Judy Ellis, Wirejewelry.com Wire Jewelry Tool Tip for January 13th, 2017 Using Household Super Glue on Minor Cuts, Nicks and Scrapes by Judy Larson A few good thoughts today from our good friend, Judy Larson. Judy...
- Posted January 13, 2017
-
Classes are Filling Up!
by Judy Ellis, Wirejewelry.com Wire Jewelry Class Information for January 9th, 2017 JOGS 2017 – Classes are Filling up! Wow! I can’t believe are only a couple of weeks away from our Tucson Classes starting! If you...
- Posted January 9, 2017
-
 New Year – New Resolutions!
by Judy Ellis, Wirejewelry.com Wire Jewelry Class Information for January 2nd, 2017 New Year – New Resolutions! Every year we make New Years Resolutions to lose weight, eat right, get more sleep etc., etc. This year, why...
- Posted January 2, 2017
-
Join us at JOGS in 2017
by Judy Ellis, Wirejewelry.com Wire Jewelry Class Information for December 26th, 2016 Join us at JOGS in 2017 Do you have a favorite instructor? How excited would you be if you had the chance to meet them...
- Posted December 26, 2016
-
 Featured Tool: AccuLoop Precision Pliers
by Judy Ellis, Wirejewelry.com Wire Jewelry Tool Tip for December 21st 2016 AccuLoop Pliers – Round and Square Nose In the market for a great pair of looping pliers? Looping pliers enable wire jewelry artists to create...
- Posted December 21, 2016
-
 JOGS 2017 – Final Instructors offering Weaving and Enameling
by Judy Ellis, Wirejewelry.com Wire Jewelry Class Information for December 12th, 2016 JOGS 2017 – Final Instructors Today we feature our final two 2017 JOGS instructors – Sara Thompson and Steven James Sara Thompson: Stitching, metal working...
- Posted December 12, 2016

Wire Jewelry Ideas
-
 See Yourself as a Creative Thinker-Part IV By Karen Meador, PhD
Wire Jewelry Article for September 27th, 2017 If...
- September 27, 2017
-
 See Yourself as a Creative Thinker-Part III By Karen Meador, PhD
Wire Jewelry Article for September 20th, 2017 If...
- September 20, 2017
-
 See Yourself as a Creative Thinker-Part II By Karen Meador, PhD
Wire Jewelry Article for September 13th, 2017 If you...
- September 13, 2017
-
 See Yourself as a Creative Thinker By Karen Meador PhD
Wire Jewelry Article for September 6th, 2017 This is...
- September 6, 2017

Design & Inspiration
-
 Free Pattern: Smile Cluster Necklace by Karen Meador
by Judy Ellis, Wirejewelry.com Wire Jewelry Pattern for August...
- August 7, 2017
-
 Free Pattern: Long crystal round maille earrings by Kylie Jones
by Judy Ellis, Wirejewelry.com Wire Jewelry Pattern for August...
- August 3, 2017
-
 Free Pattern: Stone Twist Wrap by Karen Meador
by Judy Ellis, Wirejewelry.com Wire Jewelry Pattern for July...
- July 31, 2017
-
 Free Pattern: Floating Bead Earrings By Kimberly Newman
by Judy Ellis, Wirejewelry.com Wire Jewelry Pattern for July...
- July 27, 2017
Featured Tools
-
 Get to Know Your Hand Tools – Tube-Cutting Jig By Helen I. Driggs
by Judy Ellis, Wirejewelry.com Wire Jewelry Tip for August...
- August 4, 2017
-
 Wire Jewelry Video: Using Punch Pliers by Judy Freyer Thompson
by Judy Ellis, Wirejewelry.com Wire Jewelry Tip for August...
- August 2, 2017
-
 Wire Jewelry Video: Aligning a Hole Punch by Judy Freyer Thompson
by Judy Ellis, Wirejewelry.com Wire Jewelry Tip for July...
- July 26, 2017
-
 Get to Know Your Hand Tools – Wire Cutters – Helen I. Driggs
by Judy Ellis, Wirejewelry.com Wire Jewelry Tip for July...
- July 25, 2017