


Make Your Own Curved Tube Beads
- Category: Contemporary
- Technique(s): Butane Torch Techniques
- Skill Level: Intermediate
You can buy all types of tube beads but making your own is a lot of fun and gives you many choices about size and finished texture. Here we will make a pair of plain curved tube beads and a pair with a hammered finish.
Materials

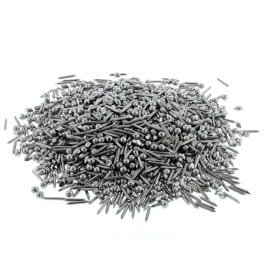
Thin-walled dead soft copper tubing outer diameter (OD) 2.4mm inner diameter (ID) approx. 1.7mm, 1” per bead.
- Lesson Quantity: 1.00 pieces
- Purchase Quantity: 1.00 each

16 Gauge Round Half Hard Copper Wire
H11-16H
- Lesson Quantity: 3.00 inches
- Purchase Quantity: 1.00 1FT
- Price: $1.26
- Gold Club Price: $0.94
Tools

Jewelers Saw with Adjustable Frame without Blade
G18-3
- G18-3
- Lesson Quantity: 1.00 pieces
- Purchase Quantity: 1.00 each
- Price: $12.97
- Gold Club Price: $9.73

Tube Cutting Jig
HOL-108.00
- HOL-108.00
- Lesson Quantity: 1.00 pieces
- Purchase Quantity: 1.00 each
- Price: $47.95
- Gold Club Price: $35.96

WET/DRY PAPER 9 x 11, 400grit- PK/10
ABR-500.25
- ABR-500.25
- Lesson Quantity: 1.00 pieces
- Purchase Quantity: 1.00 each
- Price: $12.95
- Gold Club Price: $9.71
Mandrel approx. 85mm diameter, I used a vase, a bottle will also work.
- Lesson Quantity: 1.00 pieces
- Purchase Quantity: 1.00 each
1.6mm steel rod to support tubing and sandbag if you want a hammered finish.
- Lesson Quantity: 1.00 pieces
- Purchase Quantity: 1.00 each
Instructions
Step 1
Make sure the end of the tube has a flat even edge and cut a piece of tubing 1' or 25mm long. Using 400 grit sandpaper or polishing paper remove any burs left from the saw blade and smooth the entire surface of the bead.


Step 2
To begin making the beads you need the tubing to be very soft and easy to bend, so it is best to buy dead soft or bendable copper tubing. If you can't buy soft tubing, you can bend these curved beads with hard tubing but the harder the metal the less precision you have in the shape of the curve, particularly at both ends. If you need to anneal the tubing I find the easiest way is to draw a line on the piece of cut tubing with a sharpie marker and heat the tube evenly until the sharpie mark disappears. Quench and pickle.

Step 3
I use 2 pieces of 1.5mm round copper wire to help me get the shape I want and to support the roundness of the tube and prevent it from collapsing under the pressure. Each wire is about 40mm long. I use copper because it is fairly soft and the wires can be straightened after making each bead and used again for the next bead. The wires are inserted into the tube so they meet in the middle of the tube.
Place the tube with the interior wires against the mandrel and with your fingers press the tube against the curve of the mandrel starting in the middle of the tube and working towards the ends. If you start at the ends you risk getting a pinch or sharp apex in the middle and the aim is to get a soft curve. This tube is so soft and easy to form that you can do a lot of the bending just with your fingers, but the very ends of the tube are hard to get to the right shape. The small thick wire pieces give you a lot of control over the precision of the bend - how much bend and exactly where to bend.
Once you have the main bend around the mandrel you can use the pieces of wire to bring the ends around a bit more to complete a nice curve shape. I have the wire just inside the end of the tube about 5 mm depending on where I want the curve to increase. This process is best done with lots of small changes because you are trying to get both ends to be the same and the entire curve shape to be uniform so the bead looks balanced. If necessary you can also use round/flat forming pliers as a mandrel to coax the tube around.


Step 4
If you want to make the beads with a textured finish this needs to be done after cutting the tube pieces and sanding them to a nice finish, and before bending them into a curve. I used a 1.6mm steel rod to support the tubing so it didn't loose its shape. I supported the bead on a leather sandbag and used a cross-peen hammer to create a texture and then I switched to a ball-peen to make the surface more evenly textured. Make sure you regularly twist your bead so it doesn't get stuck on the mandrel as it is already a tight fit before the hammering. I didn't anneal the tube after hammering because I was curious to see if I could bend it into the right curve. It was much harder to bend. The initial pushing against the mandrel was fine but getting the precise bends at the very ends of the tube was quite hard but still doable, so if you don't have the tools to anneal the tube you can still make these beads. If I was making them again I'd probably anneal after hammering because you do risk pinching or denting the tube with the more force that you apply. The downside to annealing after hammering is that you then need to polish the bead and you lose some of the definition of your texture.


Supply Detail
loading...
Change Metal:
This Pattern requires:
Purchase quantity:
Price: $
Gold Club Price: $
Purchase quantity:
Price: $
Gold Club Price: $

Kylie Jones
Other Patterns by Kylie Jones
 Crystal Burst Earrings
 Copper Braided Chain Maille Bracelet
 Inverted round maille temple earrings
 Inverted round maille temple earrings
 Sterling Silver Chain Maille Bridal Earrings
 Long crystal round maille earrings
 Venetian Glass Chain Maille Bracelet
 Leather and Chain Maille Bracelet
 Lapis and Brass Chain Maille Diamond Earrings
 Black Niobium and Sterling Chain Maille Bracelet
 Vibrant Wrapped Cotton Earrings
  Box Chain Crystal Drop Earrings
 Garnet 2-in-2 Chain Maille Necklace
 Round Maille and Leather Necklace
 No-solder Post Ear Wires
 Byzantine Chain Maille Long Beaded Necklace
 Silver Vine Wrapped Bracelet
 Orbital Chain Maille Earrings
 Stainless Steel Round Maille Leather Bracelet
 Chain Maille Czech Glass Spike Earrings.
  Stainless Steel 4-in-1 Bracelet
 Helm Chain Pendant
 Full Persian chain maille earrings with bright crystals.
 Swarovski Crystal Necklace with Half Persian 4 in 1 chain maille.
  Stainless Steel Beaded Chain Maille Keyring
  Stainless Steel 6 in 1 Chain Maille Bracelet.
  Gemstone Chain Maille Pendant
 Murano glass wire heart earrings.
  Niobium Zigzag Earrings
 Box Chain Watchband
 Amber Chain Earrings
 Garnet Chain Maille Earrings
 Square Wire Rings Round Maille Bracelet
 Beaded Rings Earrings
 Messy Wrap Briolette Earrings
 Byzantine Chain Maille Pendant
 Chain Maille Bail for a Stone Donut
 Byzantine Chain Maille Swarovski Crystal Earrings
 Chunky Fluorite Nugget Bracelet
 Gold Heart Necklace
 Turquoise Silver Chain Bracelet
 Sterling Silver Rainbow Bracelet
 Black Drops Stainless Steel Chain Maille Bracelet
 Stainless Steel Chain Maille Circle Pendant
  Gold Bead Pendant
 Soldered Wire Bead Caps
 Chain Maille Orbital Link Bracelet
 Curved Tube Bead Earrings
 Stainless Steel Half Persian Bracelet
 Chunky Chain Maille Keychain
 Botswana Agate Half Byzantine Chain Maille Necklace
  Chain Maille Pendant Necklace with Agate Beads
 Flowing Chain Pendant
![]()
The premier place for all your jewelry making needs. The best in wire, tools, cabochons, gemstone beads and more. As well as a superior resource for educational support to help build your jewelry making skills and techniques.
Connect With Us

® 2007 - 2024 Wirejewelry.com Powered by ClaimTheWeb Cart