


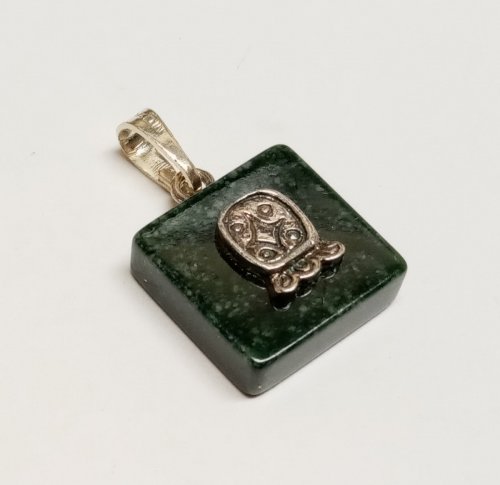


Netted Rectangle Bead Pendant

Designed by Albina Manning
Skill Level: Beginner/All
Technique: Wire Wrapped Bead Component
I have a habit of collecting beautiful, large gemstone beads. This is one of the ways I use wire to make a stylish pendant with them. Please notice that I use craft or florist wire to plan my design. When I am happy with the results, I create the finished item using a precious metal wire, in this case sterling silver. Although the following pattern uses a specific sized bead, by using my formula you can plan and make these pendants from about any size!
Formula: 1 foot for each desired 3 complete wraps around a bead + the length of the bead + 2 inches
Materials
- 1 25" length of 22 Gauge Round Soft Wire
- 1 Flat, Rectangular Shaped Bead - Approximately 1¾" x ¾"
Tools
Instructions
-
Clean, straighten and then cut the 22g wire length needed. Measure and mark one inch from one end and use round nose pliers to make a simple loop (which will become the bail). Do not cut any wire!


-
After making the loop, bend the short end of the wire down at a 90° angle, so it lies next to the longer wire length. Insert this wire into the bead at the end you desire to be the top of the pendant.
Note: If the bead hole is not big enough for both wires, make a wrapped loop instead of simple loop, trim the short tail and insert the wire into bead hole.

-
Leaving ⅛ inch of wire between the bottom of the loop and the top of the bead, bend the wire on the bottom toward what you choose to be the back of the bead/pendant.

-
From the bottom of the bead, on the back, measure up the bead ¼ of the way and make a 90° angle in the wire, heading toward one side of the bead. Continue to wrap the wire around the entire bead, ending up again on the back.


-
On the back, thread the end of the wire under the first angle made, and carefully pull to tighten it around the bead. Measure up the bead to about the halfway point and make another 90° angle in the wire, heading it back toward the same side it just came around, beginning to "net".


-
Repeat the same procedure used in step 5, continuing to "net" the bead until you have reached the top of the bead, on the back.

-
Bring the end of the wire to the top of the bead and use it to wrap around the top loop/bail, wrapping from the top of the bead up, toward and ending immediately under the loop/bail, and trim.


-
If you like the look of the straight wires going across the pendant, your piece is now finished. However if you would like to add "waves" on the front of the pendant, place flat nose pliers on the wire where you desire, and give a slight twist. Repeat wherever you would like, always twisting in the same direction.


 Free Wire Jewelry Patterns
Did you find this pattern through a link from a friend? This Free Wire Jewelry Pattern is just one of dozens of free wire jewelry patterns we send via email. Get patterns like this one straight to your inbox - click here!
![]()
The premier place for all your jewelry making needs. The best in wire, tools, cabochons, gemstone beads and more. As well as a superior resource for educational support to help build your jewelry making skills and techniques.
Connect With Us

® 2007 - 2024 Wirejewelry.com Powered by ClaimTheWeb Cart