


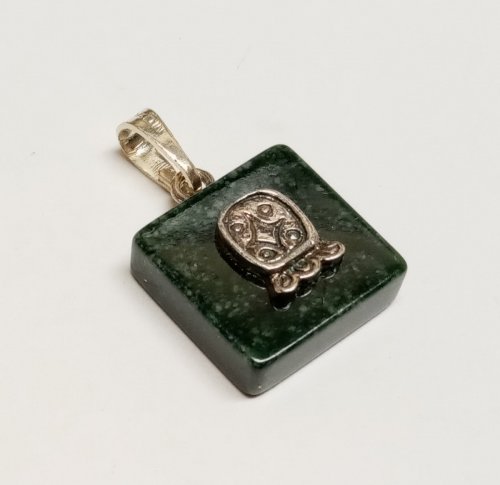


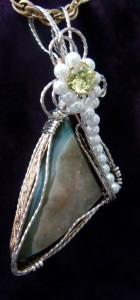
Interchangeable Pendant Frame

Designed by Sherrie Lingerfelt
Skill Level: Advanced Intermediate
Technique: Precise Bending & Forming Heavy Square Wire
This may sound incredible, but I actually woke up from a dream about this design and immediately made a sketch. The resulting pendant turned out to be very versatile. I used a large, reconstituted turquoise bead to show you how to use it, but as the creator you can make a variety of individual bead charms or small pendants to interchange on this frame. (And "Cougar" is always saying, “Versatility equals affordability!”)
Materials
- 1 12" length of 16 Gauge Square Half-Hard Sterling Silver Wire
- 1 3-3/4" length of 18 Gauge Half-Round Half-Hard Sterling Silver Wire
Tools
- Chain Nose Pliers
- Flat Nose Pliers
- Round Nose Pliers
- Angle Cutters
- Tape
- Ruler
- Fine Tipped Marker
Instructions
-
Using 16g wire, straighten, measure and then cut one piece 10-1/2 inches long and one piece 1-1/2 inches long. On the 10-1/2 inch wire, make each of the following marks in consecutive order, measuring from each previous mark.
Make first mark 3/4 inches from one end.
2nd mark: 3/4 inches up and away from first mark.
3rd mark: 2 inches
4th mark: 3/4 inches
5th mark: 1 inch
6th mark:a second 1-inch mark
7th mark: 3/4 inches
8th mark: 2 inches
9th mark: 3/4 inches

-
Use flat nose pliers to hold at first 3/4 inch mark and make a sharp 90° angle down. Then hold the wire at 2nd 3/4 inch mark and make a sharp 90° angle down. Next, hold the wire at 2 -inch mark and make a sharp 90° angle up. Finally, hold the wire at 3/4 inch mark inch and make a sharp 90° angle down.


-
Using round nose pliers hold the wire at 1-inch mark and roll wire down 180°. This will form the bail.

-
Next, hold the wire at 2nd 1-inch mark after the bail roll, and use pliers to make a sharp 90° angle out. Then hold the wire at 3/4-inch mark inch and make a sharp 90° angle down, and then hold the wire at 2 inch mark inch and make a sharp 90° angle in, forming an open square. Finally hold the wire at 3/4inch mark inch and make a sharp 90° angle down.


-
On the 1-1/2 inch 16g wire, measure and mark 3/8 inch down from one end. At the very tip of this wire, use chain nose pliers to slightly bend the tip out. Holding the wire at the 3/8-inch mark with round nose pliers, bend both ends up to form a hook. Hold the hook in the pliers at 1/4 inch from curve of hook, and slightly bend the long end of the hook backward. Close hook slightly.


-
Measure and mark 3/8 inch from top of hook. Place the hook between bail wires, lining up the 3/8 mark with the bottom end of the bail wires and tape in place. Use the 3 3/4 inch 18-gauge, half round wire to make 4 wraps to show, at base of bail, wrapping the hook into the bail.

-
Use chain nose pliers to bend the top of the hook toward the back, and crimp down over the wraps. Use round nose to hold top of bail and roll backward to complete the form.

-
Line up the bottom wires of the pendant and tape together. Use the remaining 18 gauge, half round wire to make 3 wraps to show, closing the frame.

-
Use flat nose to hold these newly made wraps, while slightly separating the wire ends. Then use chain nose to roll each wire out and up, to form rosettes.

-
Place your favorite bead on a wire; the gauge depends on size of bead. I used a 20 gauge round for this large, oval bead. Make a rosette on one end, drop the bead on the wire, and make a closed loop on the top to hang your treasure!
 Free Wire Jewelry Patterns
Did you find this pattern through a link from a friend? This Free Wire Jewelry Pattern is just one of dozens of free wire jewelry patterns we send via email. Get patterns like this one straight to your inbox - click here!
![]()
The premier place for all your jewelry making needs. The best in wire, tools, cabochons, gemstone beads and more. As well as a superior resource for educational support to help build your jewelry making skills and techniques.
Connect With Us

® 2007 - 2024 Wirejewelry.com Powered by ClaimTheWeb Cart