


Love Drop Earrings

Designed by Sonja Kiser
Skill Level: Intermediate
Technique: Involved Components
With Valentine's Day just around the corner, I took out several of my heart shaped beads to see what designs I could create for that special day. I had purchased several of these crystal heart beads, drilled from front to back. (Not realizing at that time, just how difficult it would be to make use of these beads.) My goal then became to create a design, using these beads. This "Love Drops" earring pattern is the culmination of this effort. I hope you enjoy making this design as much as I enjoyed creating it. Feel free to use your own imagination to alter the pattern, by changing the colors, sizes and/or styles of the beads.
Materials
- 1 13" piece 22-gauge square half hard silver wire
- 2 10mm crystal hearts, drilled from front to back
- 6 2mm sterling silver round beads
- 4 2.5mm sterling silver round beads
- 4 3mm round sterling silver beads
- 4 3mm round crystal beads
- 2 6mm heart sterling silver beads, vertically drilled
Tools
- Chain Nose Pliers
- Round Nose Pliers
- Flat Nose Pliers
- Wire Cutters
- Power Wire Twister
- Ruler
- Extra Fine Point Marker
Instructions
-
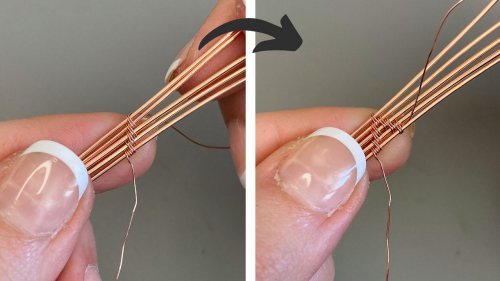
Use the 22-gauge wire to straighten, clean and then cut one 12 ½" piece. Twist the entire length and then cut it in half, making two 6" pieces. Mark both wires at their center. One wire at a time, place the center mark on the largest part of the round nose pliers. Bend the wire around the pliers, creating a U shape. Repeat procedure on the other wire.


-
Thread a 10 mm crystal heart bead onto each U shaped wire.

-
Mark both wires of each component, at 1 ¼" above the heart bead.

-
On one component, add the beads in the following order: three 2mm silver, two 3mm silver, two 3mm silver, and one 3mm crystal. On the opposite wire of the same component, put one 3mm silver. Repeat on the second component.

-
Bend front wire (the one with the most beads) at the 1 ¼" mark, to the right, making a 90° angle. Bend same wire on the second component to the left.

-
Using the corner of each angle just created, begin a wrapped loop (turning the round nose pliers to keyhole the loop).

-
Finish the wrapped loop by using the opposite wire to make the binding. Wrap 3 times and end with the wrap wire extended to the front. Trim this extended wire to ½", rosette and place it over the binding just made. Repeat same procedure on second component, in the opposite direction.


-
While holding the wraps with flat nose pliers, use your fingers to pull the center wire out and to the right, creating a 90° angle. Repeat using the second component pulling the wire to the left instead of the right.
Trim each of these center wires to 1". Using the round nose pliers (about midway from the point) curve each extended wire around and into the inside, and out of the opposite side, of the component. Repeat on second component going in the opposite direction from the first component.

-
On each earring, from the end of each extended wire, measure 3/8" up and mark. Using flat-nose pliers at this mark, bend each wire downward, forming a 90° angle.

-
Put a small, vertically drilled, sterling silver heart bead onto this wire, making a small loop at the bottom of the bead to hold it in place. Repeat same procedure on the second component.

-
If needed, use flat nose pliers to reposition the wire so the silver heart bead is turned toward the inside of the component. Repeat on the second component if necessary. Attach ear wires.

 Free Wire Jewelry Patterns
Did you find this pattern through a link from a friend? This Free Wire Jewelry Pattern is just one of dozens of free wire jewelry patterns we send via email. Get patterns like this one straight to your inbox - click here!
![]()
The premier place for all your jewelry making needs. The best in wire, tools, cabochons, gemstone beads and more. As well as a superior resource for educational support to help build your jewelry making skills and techniques.
Connect With Us

® 2007 - 2024 Wirejewelry.com Powered by ClaimTheWeb Cart